Thursday, December 31, 2015

Baby Room Redo - Step #1

With less that two months until Baby Geurs arrives, it is time to get going on the Baby's room. I have had plans for the room since finding out the gender. Having the time, motivation, and energy to work on the room has been the issue. So, now I begin.

First off, the room still had several boxes of random stuff that we just put in there when we moved into the house cause we didn't know what to do with them. And there they stayed for two plus years. We have also accumulated other random item in the room along the way. To begin the process we had to move all that stuff out of the room. That meant sorting, throwing away stuff, donating stuff, and moving stuff to the attic, basement, or other rooms. Not a fun process. We got it done though. Here are some before photos that I snapped quickly to show how the room started out. Note that at this point a lot of the extra stuff had been removed and some baby stuff had been moved in.


Not real exciting photos, but you can see that there is some work to be done. I have started removing the wallpaper. Not an exciting job, but it has to be done if the room is going to be painted. The old wallpaper (like much of the rest of the house) was in terrible condition and was ripped and coming off in several spots. Not to mention there are three layers of wallpaper and three borders on the wall. I have not idea what these people were thinking when they just kept layering it on. 

Stay tuned for updates as the work progresses. Step two is to remove all the wallpaper and paint the room and ceiling. 

Thursday, November 12, 2015

Sleep for Little Ones -- book review

Lisa Tawn Bergren has a series of books for young children that all begin with; “God Gave Us …” The latest in the series is God Gave Us Sleep. I’m sure that the other books in her series are cute, enjoyable, fun reads for a little one. I haven’t actually read any of the other books though. This was the first one that I have had the opportunity to read. After reading God Gave Us Sleep, I wouldn’t hesitate to read or recommend Bergren’s other children’s books. As a child, I was a reader, and I enjoyed being read to as well. I have read many children’s books during my life, and I can’t wait to get to read this book to my child someday. (First baby on the way.)

An aspect of God Gave Us Sleep that is so charming is the artwork. Laura J. Bryant has created these adorable pictures that I can imagine any child loving. Who wouldn’t love a super cute cub and all of her arctic friends? The art is beautifully done on every single page, giving the child plenty of pictures to look at while reading the story. These pictures help to make the story come alive.

Bergren does a great job of not just making this a book about bedtime, an often stressful and tiring time for parents. She includes why it is important to get sleep, what happens if you don’t get the needed sleep, and things that can seem scary about sleep to a child. In my opinion this adds depth to the book that can be appreciated not just by kids, but by their parents too. For me, a mark of a good children’s book is one that a parent wouldn’t mind having to read multiple times to their child. This book falls into that category for me.


I received this book for free from Blogging for Books for this review.

Friday, October 30, 2015

From Trash Burner to Fire Pit

Last weekend the weather was nice; and Gerrit and myself both had the weekend off. That doesn't happen very often. We made plans to tackle some outside work over the weekend and I am sure glad we did. A little rain got in our way and slowed us down, so we didn't accomplish as much as we wanted. We did get the gutters cleaned out, oh yeah that is never a fun job. We also demolished the old brick trash burner that was in the middle of our yard and  replaced it with a fire pit. That was a more fun project cause we have been wanting to do that since about last summer.

Here is what the old brick trash burner looked like. (Old picture from when we first bought our house.)

The trash burner was still usable, but some of the bricks were starting to come loose or cave in. And honestly we didn't use it very often. Maybe a few times in the spring or fall to burn sticks and leaves. We don't burn our trash, so we didn't need it for that. 

Gerrit was given a sledge hammer by one of our friends. I guess those are the kinds of gifts men exchange. So, before I was even ready and outside to work, he had to whole things down. It came apart pretty easily and quickly. 

Next we had to pick up all that brick. This was the part that took the longest. We loaded it all in the back of the truck, then unloaded it around some pine trees on the side of the yard so it is out of the way. 

When it was all cleaned up, we were left with a square cement slab that was the foundation of the trash burner. We left that in place and decided it would be easiest to put a pre-made fire pit on top of it. We did discover that under the cement slab there is actually a large hole that has cement sides. This is such a mystery as to what that was there for. We did check it for bodies though, all clear. We had some cement landscaping pavers that we were not using. We actually picked those up for free from someone's house on a Sunday after church. It took me a few minutes and a few tries of how to lay them out, but I figured out something that would work and give a nice edge around the cement. The extra space on the one side of where the fire pit isn't can be used to stack the wood that is waiting to be burned. 

Then we were off to Rural King to get some rock to fill in the empty part and get a fire pit. And then the rain came, and the work stopped until the next day. The next day I used three bags of black lava rock to fill in the space. Some of the cement slab was uneven, so I wedged some rock pieces under the pavers to keep them steady. We assembled the fire pit. Then we were done. 

The spot looks so much better and more up to date without the trash burner.

We were proud of our work. Not to mention the payoff looked something like this. 


Saturday, September 26, 2015

It's Good to Be Queen -- book review

In Liz Curtis Higgs’s latest book she dives into the life of the Queen of Sheba. The basis for the book is taken from 1 Kings 10:1-13. Liz is a seasoned author, and she knows how to do her research. Not only do you have the Scriptural basis, but there is a fair amount of other resources and information that she sites as well. All of that along with her personal stories, input from other women, and a dab of storytelling make for an interesting and quick read in It’s Good to Be Queen.

I don’t think that I would generally pick a book about the Queen of Sheba for my reading material usually, but being familiar with some of Higgs other works I figured it would be good. She did not disappoint. I know about the Queen of Sheba from the few Bible passages that she is mentioned in. I also have heard some historical information and some speculated stuff about her. Even with the knowledge that I already had of her, I felt that Liz did a great job of really diving into who the Queen of Sheba was in a fresh new way that made me look at her in a different way.

The book itself is broken down into ten different chapters that each focus on a portion of Scripture from 1 Kings 10, and what lesson or insight we can draw from that. This book covers a lot of subtopics. The story of Sheba ties it all together though, so it works. The way that the book is set up it would be great to use in a woman’s Bible study, Sunday school, or book club. Liz even includes a study guide in the back of the book. There is actually one that is meant for a one time discussion of the book; a book club setting. One that is broken up into 10 sections, one for each chapter of the book; a woman’s group or Sunday school setting. Now, of course you can also use the study guide for yourself to getting thinking about the reading a little more.


I received this book for free from Blogging for Books for this review.

Saturday, September 12, 2015

Autumn Wreaths

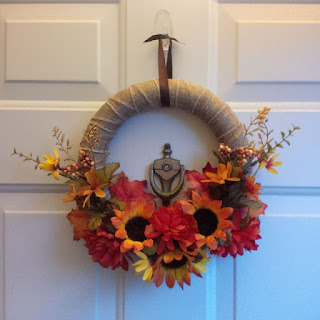
The weather is cooling down and I am waiting for the leaves to start changing. Ready for fall to arrive. Yesterday I put up the fall wreaths. It is September, so it isn't too early for that, right? One wreath I already had and the other was a quick make.


Here is the one that I made last night. It was super easy, quick, and cheap. Those three things go together quite well if you ask me. It only cost me a grand total of $4.00 + tax. All supplies from the Dollar Store. Here is the list of what I used:

  • Round foam wreath form, now this is a bit small, I think it was 9", so if you want something bigger you will need to use something else.
  • One spool of burlap ribbon, one spool was 3 yrds., and it exactly covered the whole wreath form. If you want a bow or more ribbon, you will need two spools.
  • Two bunches of fall flowers, I cut them apart and rearranged them to give them a fuller look. 
  • Small piece of leftover ribbon that I already had to make a loop to hang the wreath with. 
  • Glue gun to attach the flower and secure the ends of the ribbon. 

There you have it. Wreaths are way overpriced in the store and you can make your own for much cheaper. The decoration that I put on the other door was something that I had made a few years ago, for FREE. I made it when I wanted something autumn decor-ish to put up, but didn't have extra money to buy stuff to make anything.


Here is what I used and how I made it.

  • Small sticks that I picked up from the yard. just broke them to make them the right size. Bundled four together and secured them with floral wire. Then glued the bundles together at the corners, like a picture frame.
  • Piece of a paper bag. Cut it into the size of square that I needed to fit inside the stick frame. Hand wrote our last name on it and then filled it in with a black sharpie. Glued the paper onto the back side of the sticks.
  • Leftover fake fall leaves and a piece of ribbon. Hot glued the leaves to the sticks and the ribbon to the back of the sticks. 
Using leftover materials, it was all FREE!

Happy Fall Crafting!


Monday, July 13, 2015

Rise of the Fallen -- Book Review

The second installment in the War of the Realm series by Chuck Black is Rise of theFallen by Chuck Black. Having read the first book in the series, Cloak of the Light, I was very excited to get to read  and review the second book as well. Rise of the Fallen did not disappoint! In some ways it may have even been better than the first book in the series. The second book really adds to the story of the first book. I am interested to see where the next book goes with the story.

The first book, Cloak of the Light, focuses on the main character of Drew Carter. For the most part it is written from his point of view. Throughout that book you see the war that is going on in the spiritual realm, but from a human perspective in most ways. In Rise of the Fallen, the focus is on an angel, Validus. Most everything is from his perspective. This completely changes the tone of the book. This book has much more of a supernatural war tone to it because of it being from the point of view of Validus, a warrior angel. The war may be a supernatural war, but it very much has the feel of a natural war.

This book also doesn’t just focus of the story of Drew from Validus’ point of view. The story weaves back and forth between the story surrounding Drew and the history of Validus. You see Validus move from an inexperienced angel at the beginning of time to one of the greatest warrior angels that there is. This part of the story moves along through some significant moments in Biblical history. Throughout this book the parts about Validus may be more intriguing than the parts following the story of Drew.

My one warning of this book, and really this series, is that some people may find some theological fault in it. Clearly some the parts involving and about the angels, demons, and spiritual warfare is fictionalized. There is only so much that we know about the spiritual world from the Bible. Chuck Black does take some liberties in this area. A great thing that he does to back up his writing is put stuff that is a direct Biblical quote or Biblical truth in bold letters. Then there is a reference in the back that corresponds to these parts and gives explanations. He also addresses some the things that may bring up questions about the spiritual world, and backs up his answers with Scripture. This is a great resource, especially since this book is written for the young adult genre. It is equally good for the adult reader too.


I received this book for free from Blogging for Books for this review.

Saturday, June 6, 2015

Old Crate Turned Flower Box / Hose Holder


I am not sure where May went, but time is flying by. Several weeks ago I did manage to plant all my flowers and the garden. Last year I made my Flower Towers. The 3 Pot one is in use again this year, but the Topsy Turvy one had to be disassembled, as the support pole didn't make it through the winter :( . Still using the pots. They are just sitting on the sides of the steps to the front door. This year I was inspired to come up with another new planter too.

This one was super simple and I used stuff that I already had. The only items that I had to purchase were the potting soil and flowers. Here is my Old Crate Flower Box / Hose Holder.


We had this old crate in our garage, it came with the house, and it wasn't being used for anything. It has a lid with broken hinges, so I just left it on there and leave it open, but I could close the top when summer is over.

Now, I didn't want to fill the entire thing with potting soil. First of all, it would be super heavy and I wouldn't be able to move it on my own if needed. Second, I didn't want to use that much potting soil. And lastly, I didn't think I had enough flowers left to fill the entire thing. So, I found an empty plastic container. Actually it is an old kitty litter box that someone gave us. I put the tray that a flat of flowers comes in underneath it so that it would sit up higher. With the empty space leftover, I coiled up the hose and put it in there to keep that out of the way. Really simple and easy. 


Monday, April 20, 2015

Side Entrance / Mudroom / Porch Redo

Getting a room redone seems to take me months, or years. At the rate that I am going our house will be completely redone about the same time we pay off our mortgage. The first room that I managed to finish was the bathroom. Now I have worked on other rooms and other stuff in the mean time. Such as the dining room, it may be my thorn in my side. I will greatly rejoice when that room is finished. Back to the porch / side entrance / mudroom, because it is actually finished. :) Now, I'm not completely sure what to call this room. You see it is an enclosed porch, which happens to also be the entrance that we mainly use, and we use it as a mudroom. We usually refer to it as the porch though, so that it what I will call it here.

Here are the before shots.


 As you can see, the porch was a catch-all for lots of stuff. I showed Gerrit these pictures and his response was, "Is that really what it looked like?" Uh, yeah.

The porch was a pretty easy makeover really. It took me a total of two or three days to get it done. Those days just happened to be seven months apart. I did the bulk of the work on this room way back at the end of September. It all started with a little inspiration. I had a larger antique American flag that I wanted to hang somewhere and leftover yellow paint from painting the bathroom. Thus my inspiration picture. 
entry hallway from before civil war in whole house remodel farmhouse addition
I found this picture on This Old House. I used my flag, which happens to be an antique 48 star flag (sorry Alaska and Hawaii, no offense to you) that I purchased at an auction for $20. I actually got it for Gerrit a while back, but we hadn't done anything with it yet. It now covers that top of the window which connects to the bathroom.  
Next, came painting. Removed the wallpaper border and added a couple layers of paint to the wall under the windows. Left the old siding walls as they were. Just cleaned them up a little. I actually like the old siding just the way it is. 

Then I added some little touches to the room:

  1. A simple string of lights about the ceiling on one side. This adds a little extra light when needed. The porch area only has one other light for the whole area. Originally I had a more elaborate plan to make some hanging lights, but Gerrit suggested just using Christmas lights that we already had. Sometimes simpler is better. 
  2. Put a wooden drying rack against the wall for any wet clothes. 
  3. Added a metal tub ($5 at a second hand store) for shoe storage and a tray with rocks for wet shoes. Need to add more shoe storage though, cause this doesn't contain them all.  
  4. Spray painted the base of the wall light. From shiny silver to oil rubbed bronze. 
  5. Put up new coat hooks, a decorative hook for leashes, and a basket to hold miscellaneous items. This may be my favorite part of the the room. I also found this second hand for like $1 and spray painted it red. This basket is actually for Gerrit to put keys, wallet, and such in. Just trying to avoid playing the where is my ................. (fill in the blank) game. He says that I can't change his ways though. Let me also add that the owl hook is actually made from re-purposed materials found after Hurricane Katrina. Gerrit bought it while he was in New Orleans last year. 
  6. Hung a welcome sign that I made and some patriotic plates. 

  7. Hung our "Animal Rescue" sign. Let me note that we don't actually have an animal rescue in our house, it just feels that way sometimes with two cats and two dogs that are all rescue animals. Actually, my brother made this for us as a Christmas gift. I don't dare hang it outside, we could end up with more pets. 
  8. I also changed out the knobs on the cabinets and added a few decorative pieces to the window ledge. Side note, this window is one of the things that I loved about the house when we first looked at it. I like those old details. 
  9. And lastly was the bench. I actually finished everything else on the porch in two days. Then several months later I finished the bench, which was the finishing touch. This was actually a side table thing that I got at an auction for $5! I painted it with the same yellow as the walls. Spray painted the hardware and bottom of it with an oil rubbed bronze. Added some legs that I made from scraps of wood that I spray painted the same oil rubbed bronze. Made a simple cushion for it, and that was it. It is cat approved! They actually think it is a new bed for them. I've already cleaned a good deal of hair off of it, and that is why I made it so that it could be removed and washed. 

And there it is, the made-over porch. A little cleaning, paint, and decorative touches make a big difference.

Sunday, March 29, 2015

Spring Wreaths

It is Spring. It doesn't feel like Spring here yet. Easter is one week away and we may all be wearing winter coats while hunting for eggs. I want it to be Spring feeling right now! I have noticed some cute Spring and Easter wreaths springing up (excuse the pun) on doors lately. I love the look of a wreath on a door. It makes the home look a little more put together, lived in, and welcoming. I didn't have any Spring wreaths for my doors. In fact all I have is Fall and Christmas.

Last night I decided to solve this problem and put together some Spring wreaths. Gerrit was gone and I had drank a big mug of coffee too late in the day, so I had plenty of energy and would be up for a while. I did a quick perusal of Pinterest for some inspiration. There are a ton of great ideas for wreaths on there. Then I pulled out my craft suicase. Yes, I have an old suitcase that is full of my crafty type stuff. I would prefer a sewing / craft room, but not sure where to fit that in my house. After looking through my stuff I just started putting together some wreaths.

The first one turned out really cute.
First, I took a thin old plastic wreath frame that I had and covered it with strips of paper from a brown paper bag. I just cut off the bottom of the bag and cut it into strips. Crinkled those strips up and then flattened them out and wrapped them around the wreath frame, gluing them down as I went. Then, I added some big flowers. It is was cute and simple as it was, but need something more. I think that garland pennant look that is popular right now is cute. So, I made some with ribbon and scrap paper. Glued that onto the wreath, added a bit of ribbon and a small bow to the top, and that was it. 

I have two entrance doors, so I needed two wreaths. Thus, the second wreath.
I need a base for the wreath, so I searched around and came up with a piece of cardboard. Cut it into an oval, could have made it round, but wanted something a little different. Covered it with some white felt. Then glued on some leaves, flowers, a bow, and ribbon to hang it. That was it. Pretty simple if you ask me. Funny side note, when I look at a picture of this wreath it sort of reminds me of a toilet seat with flowers on it. Oh well, it is staying on my door for now. 
 After making these wreaths I have come to this conclusion; you can make a wreath or door decoration out of all kinds of stuff. Just take a look around your house and see what you can find to use. Browse the internet for some inspiration, and get crafty. I think I will now challenge myself to make door decor for each season simply from stuff that I find around my house. These wreaths were basically FREE because that it what I did. I didn't buy any extra supplies. It was a fun, quick, and free project.

Sunday, February 22, 2015

The Holy Land Key -- book review

In the HolyLand Key, Ray Bentley takes you on a journey into the lives, history, and significance of Israel and the Jewish people. Bentley has a great love for the nation of Israel. He also has made deep and lasting connections with many Jews and non-Jews who reside both in Israel and outside Israel, but who share a deep love for this nation. Bentley is an American who would be considered a Gentile, but he has spent many years studying Jewish culture, history, and significance. His love, respect, and value for this nation and its people is obvious.

In this book, Bentley tries to bring together a lot of information about Israel and the Jewish people, personal stories of people whom he has made connections with concerning the Holy Land, and the role that it plays in prophecy. He does a good job with first two fore mentioned items, the third seems to be lacking a little in my opinion. This is a bit strange considering that the subtitle for the book is, “Unlocking End-Times Prophecy Though the Lives of God’s People in Israel.” Initially reading this led me to believe this book would be more of a look at the prophecy that is seen in the book of Revelations, and how the Jews and Israel are a part of all that. Now, that is included in the book, particularly about the last third of the book. The beginning of the book is more of a look at the significance of Israel and the Jews. So, with that said, the subtitle for the book can be a bit misleading if you are expecting a book focused on prophecy as a look at the End-Times and the events that will take place during that time.

Now even though this book wasn’t what I was expecting it to be, it was still a solid read. Bentley has done his research and it shows. In fact there are many sources listed in the back of the book to back up his writing. I found The Holy Land Key to be very interesting. I feel as though I learned a lot of new information from it and gained some new perspective as well. This isn’t the type of book that I would generally read, but I am glad that I did.   


I received this book for free from Blogging for Books for this review.

Saturday, January 31, 2015

Blueberry Almond Oatmeal Bake


There is a snow storm coming, which means I want warm, yummy food. I also have some milk that needs used up before it goes bad. So, with those two motivators combined, I came up with this recipe. It doesn't take a lot to get me thinking about food or what I could cook. Since it is also the weekend, this is great cause we can just warm it up the next day for breakfast. It is quick and easy to throw together, and makes a good nutritious breakfast, or lunch, or dinner if you want.

Step by step instructions with pictures.


  1. Preheat the oven to 350. Grease a 2.5 quart baking dish. 
  2. Whisk 2 eggs, 1/2 tsp. vanilla, and 1/2 tsp. almond flavoring together.
     
    Then whisk in 4 cups milk (I used skim) until all is combined.
    It should look nice and frothy.
  3. Add 1/2 tsp. cinnamon, 1/4 tsp nutmeg, and 2 Tbs. honey. Whisk together with milk mixture. 
  4. Add 2 cups of old fashioned oats.
    Give it a quick stir. Pour all of the mixture into the greased baking dish. All the oats will sort of pile up where you pour it in, just make sure they get spread out and evenly distributed.
  5. Sprinkle 1 cup of blueberries and 1/4 cup slivered almonds over the top of the oatmeal mixture. You can use fresh or frozen blueberries. I used frozen cause that is what I had on hand.
  6. This step is completely optional, but I also sprinkled 3 Tbs. of honey crunch wheat germ on top of everything. Just to give it a touch more of goodness. 
  7. Pop it in the oven and bake for 35 minutes or so. When it is done most of the liquid should be absorbed and the oats should be cooked completely. if there is still a little liquid that is ok, it will absorb while it cools.
    Let it cool for a few minutes and enjoy. Store any leftovers in the fridge to eat later.
    Here is the recipe all nice and neat.