Showing posts with label easy. Show all posts

Friday, July 7, 2017

Private Selection -- Product Review

*This post contains affiliated links. I received these products for free in exchange for my honest review.

Summer is upon us, and with that comes summer food. Cookouts, salads, watermelon, ice cream, and the list goes on. Kroger has a line of products under the label Private Selection. I have tried many of the Private Selection items before as I am a regular Kroger shopper. With their #MyMagazineSharing program I was able to try two more products. I received full sized samples of their Green Chile Ranch Seasoning Rub and their Texas Inspired BBQ Kettle Potato Chips.


First, lets talk about he potato chips for a quick minute. I generally do not pick BBQ flavored chips if I am buying chips. I do really like kettle style potato chips though. These Texas Inspired BBQ Kettle Potato Chips were very tasty. There was a bit of tang to them. I don't know if that is generally true of Texan BBQ as I am not a Texan, not even close. I did eat my share of these chips, but my husband was the one who was really into them. He finished off the bag. (Please see the above picture of the crumpled bag that I dug out of the trash in order to get a picture of it.) So, these chips passed the taste test at our house and I would purchase them again.

Second, the Green Chile Ranch Seasoning Rub. Ok, I do not usually cook with a lot of spice mixes. I just use my general spices most of the time. Their is some convenience to spice mixes or rubs though. I actually tried this out two different ways. I first tried the rub on some chicken breasted that I just roasted in the oven. That turned out just ok. The second time that I tried the spice rub it 1 used it in my Southwest Chicken Salad. The flavor went great with the salad and was really good. Here is what I put into my salad, which is a quick summer favorite around this house.

Southwest Chicken Salad

  • chopped romaine lettuce
  • 1 can of drained and rinsed black beans
  • 1 can of drained corn, can also use fresh of thawed frozen
  • 1 tomato sliced
  • 1 diced avocado
  •  2 chicken breasts grilled and sliced. Use whatever seasoning you would like. 
  • 1/2 cup shredded cheddar cheese
  • Southwest ranch dressing
  • Optional things that you can add to the salad are croutons, green pepper, onion, tortilla strips, cilantro, salsa, sour cream

Tuesday, August 2, 2016

Baby Room - Crib

So, scraping wallpaper and painting a baby room while taking care of a baby is just not happening. Ugh! Maybe it will get done by the time Kizzy is one, or at least I hope. Poor child may just have to live in a room with partially scraped wallpaper.

It is time to transition Kizzy from her bassinet to a crib though. Actually past time since the weight guidlines for a bassinet is up to 15 lbs. and Kizzy is now 17lbs. Oops! Since we bought an older used crib at a yard sale, I wanted to at least paint it before she started using it. We got it for only $15 and it was a bit worn, but it is functional.We did buy a brand new mattress for it. :) As you can see in the picture, I taped off all the areas that were plastic, the side pieces where you hook it all together and the plastic on the top of the sides.

I debated for a while on how to paint the crib. Doing a quick search of how to paint a crib basically went with both spray paint and regular paint. So, I guess it would just be a preference. I chose to spray paint cause I figured it would be easier with all the bars and such. After all is said and done, I think the best way to paint a crib would be to use a spray gun and regular paint. This would give you the best coverage.

Then I debated (with just myself of course) what color to paint the crib. After browsing Pinterest, I found this picture of a red crib and loved it. I LOVE colored cribs. A round-up of painted cribs in every color of the rainbow! @BabyCenter #nursery #crib:  (Found here.) But then I wondered if that would be too bold. So, I almost convinced myself to go with a white or cream paint. Then I saw this one and was sold on the red. Sock Monkey Nursery @ashley Litwin if only we surprised Chris with this before Cal was born!:  Red will be perfect for the sock monkey theme that I plan to go with.

Painting the crib took longer and more paint than I expected. It took a whole 5 cans of spray paint to get it all covered. Trust me, it isn't a perfect paint job either, but it will work. So, here is the end result. (Ignore the less than great picture.) For now the crib is in our room, as we haven't transitioned Kizzy to her own room yet. Thanks to my brother, Dale, for helping my assemble the crib. It was more difficult than I anticipated.

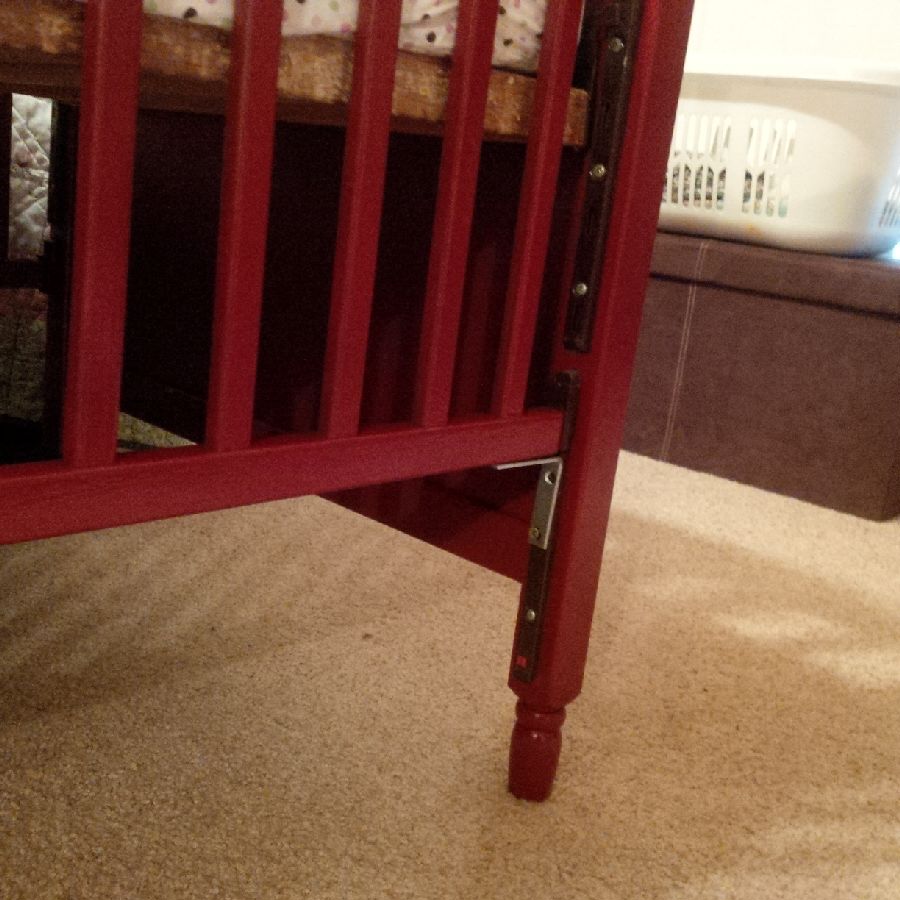
One last note. Since this is an older crib, it has a drop down side. That is a big no-no these days since it is a safety issue. Sometimes you can get parts from the manufacture to fix it. If not, there is an easy way to fix the crib so that it is safe to use. All you need are two corner brackets and some screws (about $5 at most hardware stores.) Just put the bracket at the bottom of the side rail, with the railing in the highest position, and screw it to the bottom of the rail and the side leg of the crib. Do this on both sides and the rail won't move at all.Problem fixed and crib safe! The only down side to this is that you can't take off that one side of the crib without taking off the brackets.

Again, here is the crib before and after.


Friday, October 30, 2015

From Trash Burner to Fire Pit

Last weekend the weather was nice; and Gerrit and myself both had the weekend off. That doesn't happen very often. We made plans to tackle some outside work over the weekend and I am sure glad we did. A little rain got in our way and slowed us down, so we didn't accomplish as much as we wanted. We did get the gutters cleaned out, oh yeah that is never a fun job. We also demolished the old brick trash burner that was in the middle of our yard and  replaced it with a fire pit. That was a more fun project cause we have been wanting to do that since about last summer.

Here is what the old brick trash burner looked like. (Old picture from when we first bought our house.)

The trash burner was still usable, but some of the bricks were starting to come loose or cave in. And honestly we didn't use it very often. Maybe a few times in the spring or fall to burn sticks and leaves. We don't burn our trash, so we didn't need it for that. 

Gerrit was given a sledge hammer by one of our friends. I guess those are the kinds of gifts men exchange. So, before I was even ready and outside to work, he had to whole things down. It came apart pretty easily and quickly. 

Next we had to pick up all that brick. This was the part that took the longest. We loaded it all in the back of the truck, then unloaded it around some pine trees on the side of the yard so it is out of the way. 

When it was all cleaned up, we were left with a square cement slab that was the foundation of the trash burner. We left that in place and decided it would be easiest to put a pre-made fire pit on top of it. We did discover that under the cement slab there is actually a large hole that has cement sides. This is such a mystery as to what that was there for. We did check it for bodies though, all clear. We had some cement landscaping pavers that we were not using. We actually picked those up for free from someone's house on a Sunday after church. It took me a few minutes and a few tries of how to lay them out, but I figured out something that would work and give a nice edge around the cement. The extra space on the one side of where the fire pit isn't can be used to stack the wood that is waiting to be burned. 

Then we were off to Rural King to get some rock to fill in the empty part and get a fire pit. And then the rain came, and the work stopped until the next day. The next day I used three bags of black lava rock to fill in the space. Some of the cement slab was uneven, so I wedged some rock pieces under the pavers to keep them steady. We assembled the fire pit. Then we were done. 

The spot looks so much better and more up to date without the trash burner.

We were proud of our work. Not to mention the payoff looked something like this. 


Saturday, September 12, 2015

Autumn Wreaths

The weather is cooling down and I am waiting for the leaves to start changing. Ready for fall to arrive. Yesterday I put up the fall wreaths. It is September, so it isn't too early for that, right? One wreath I already had and the other was a quick make.


Here is the one that I made last night. It was super easy, quick, and cheap. Those three things go together quite well if you ask me. It only cost me a grand total of $4.00 + tax. All supplies from the Dollar Store. Here is the list of what I used:

  • Round foam wreath form, now this is a bit small, I think it was 9", so if you want something bigger you will need to use something else.
  • One spool of burlap ribbon, one spool was 3 yrds., and it exactly covered the whole wreath form. If you want a bow or more ribbon, you will need two spools.
  • Two bunches of fall flowers, I cut them apart and rearranged them to give them a fuller look. 
  • Small piece of leftover ribbon that I already had to make a loop to hang the wreath with. 
  • Glue gun to attach the flower and secure the ends of the ribbon. 

There you have it. Wreaths are way overpriced in the store and you can make your own for much cheaper. The decoration that I put on the other door was something that I had made a few years ago, for FREE. I made it when I wanted something autumn decor-ish to put up, but didn't have extra money to buy stuff to make anything.


Here is what I used and how I made it.

  • Small sticks that I picked up from the yard. just broke them to make them the right size. Bundled four together and secured them with floral wire. Then glued the bundles together at the corners, like a picture frame.
  • Piece of a paper bag. Cut it into the size of square that I needed to fit inside the stick frame. Hand wrote our last name on it and then filled it in with a black sharpie. Glued the paper onto the back side of the sticks.
  • Leftover fake fall leaves and a piece of ribbon. Hot glued the leaves to the sticks and the ribbon to the back of the sticks. 
Using leftover materials, it was all FREE!

Happy Fall Crafting!